

1. Mount a sheet of 140 lb Arches Cold Press to a wood panel, using PVA, and the trim the excess off the edges. Let it dry for an hour.
2. Paint in a washy sky-y background, draw portrait on top in very, very light pencil.
3. Block out the face (the shape of the contour of the face) in red oxide (a nice cheap opaque pigment) with a little payne's grey mixed in to give it a slight variation, being careful of the edges.
4. Block out the hair shape and eyebrows in payne's grey, again being careful of the edges.
5. Start into lighter tones to "pull" out midtone highlights. Basically, stating to shape out the cheekbones, bridge of the nose, ears, back of the neck, and forehead - using dry brush
6. Move up the the value scale being careful to not just keep mixing in white, but using cadmium yellow, napthol red, and light portrait pink to keep it warming - not just lightening, using dry brush. So far, I've pretty much just used a #6 Filbert.
7. Use light on the sky as a high point for the highlights - in this case, the slightly whited out light portrait pink for the highlight.
8. Descend down into cooler tones and dark from the red oxide mid level, using payne's grey and dry brush.
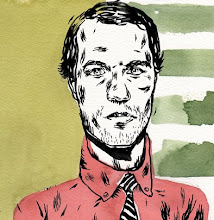
9. Use a bit of a napthol crimson wash on the upper left side of the forehead to allow the right side to pop a bit a more.
10. Wash a bit of brilliant blue into the mouth/chin area.
11. Realize you should have been painting the shirt, tie, and jacket at the same time and add them in.:)
12. Throw in plane for extra depressing affect.
13. Besides prep and background painting, about two hours - not bad, have a cup of coffee.
14. Happy belated Valentine's Day!!

2 comments:
I always do step 11 with the ears. Every time.
It's always something. Swear to god. Drive you crazy doesn't it when you do the same oops over and over again? :)
Post a Comment